Saturday, December 17, 2011

Pan Fried Coconut Catfish

I'm taking a break from composing and kettlebell training to deliver a very special recipe; one that is near and dear to my Southern heart.

PAN FRIED COCONUT CATFISH!

Despite the word COCONUT in the title of the recipe, this preparation is not particularly sweet - at least not like coconut shrimp. In fact, the sweetness is subtle and juxtaposed with the spicier paprika and black pepper. I intend to do some product placement in this post, so be forewarned.

Ingredients:
Coconut oil - unrefined or refined will do. Refined is less sweet than unrefined.
Three large catfish fillets, about 1.25-1.50lbs
.5 cup of coconut flour - even the notoriously mediocre Bob's Red Mill CF works well in this case.
One lightly whipped egg white
Himalayan sea salt, about .25 teaspoon
Black pepper, a lot
Paprika, approximately .5 teaspoon - more if you're adventurous


This is where the "product placement" part comes in. The Tellicherry black pepper on the left and the pretty wood salt mill are from my new friends at the Oaktown Spice Shop on Grand Ave.


Heat coconut oil over medium heat in sauce pan or cast iron skillet.


Lightly whip the egg white with a fork so that it's foamy. Pour onto a flat plate. (There was supposed to be a picture of this, but it didn't take.)


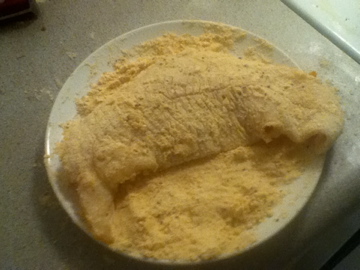
Combine coconut flour, salt, pepper, and paprika. Pour onto a flat plate.


Not enough pepper. Add more.


Place fish fillet in egg wash. Flip to cover other side.

Place the egg-y fish in the coconut flour mixture. Make sure fish is COMPLETELY covered in the delicious flour mixture.


Let the browning beginning. Depending on the size of the fillet, you'll need to cook 5-8 minutes on each side. I had larger fillets, so I needed closer to 8 minutes.


Repeat the process of dredging and browning.


 More pepper.


CONGRATULATIONS! You have just made the world's finest coconut flour fried catfish! I highly recommend serving alongside sweet potato home fries, recipe courtesy of Adrienne Harvey of GiryaGirl.com.

Don't forget about a wedge of lemon and tar tar sauce! This isn't the midwest!


I was just joking about the midwest. I'm pretty sure no one eats fish in the midwest. Haha!

Tuesday, October 25, 2011

Acorn Squash Lasagna: Everything is better inside of something else

Someone had told me about a restaurant of Diners, Drive-Ins, and Dives that stuffs lasagna into an acorn squash. I hadn't seen the episode for myself and I couldn't find any other information on it, but I thought the idea was amazing. Today, I improvised an acorn squash lasagna and it was wonderfully successful. Basically, it's an acorn squash divided in half, stuffed with thin slices of zucchini and eggplant, layered with tomato sauce and ground beef, and topped with goat cheese. It looks beautiful and tastes amazing. It would make a terrific side dish to roasted chicken or turkey breast or pretty much anything. It's also stupidly simple to make.

Ingredients:
1 medium acorn squash
Jar of tomato sauce
1/4 - 1/2 pound of ground beef
1/2 small eggplant
1/2 small zucchini
Goat cheese

Serving size: 2 - one squash half per person

Cut the acorn squash in half. Discard seeds. On the side that has the "pointy" end, cut off the end so that the squash can stand up.


Put the squash in a roasting pan, flesh side down, with a centimeter of water. Roast the squash for 20-25 minutes in the oven at 350 degrees (F).


While the squash is roasting, saute your ground beef until brown and thinly slice the veggies. The veggies will act as your lasagna sheets.


At this point, the squash may still be a little firm. That is okay. The squash will be in the oven again later, so it will soften more.

You may feel like you want to stuff the squash more than it will let you. Feel free to remove some of the flesh from the cavity.

Drop a dollop of tomato sauce at the bottom of the squash cavity. Layer with veggie slices and ground beef. I recommend having a close-able jar of tomato sauce, because you won't use very much sauce - about 1/4 cup per acorn squash half. Return squash to the oven on a dry roasting pan (just dump the water from earlier). Bake the squash for 15-20 minutes at 350 degrees (F).

Now for the most important part. Remove the squashes from the oven and top with goat cheese. All the goat cheese you want. Because it's GOAT CHEESE!

You now have a very successful dish before you. Enjoy it.

Blog Revitalization

Revitalization commence in 3...2...1....BLAST OFF!

It's been a long while since I updated. That's because many things have happened. My husband and I successfully relocated from Central Florida to Oakland, California for graduate school. The cross-country trip took five days, including a day long pit-stop in Memphis, TN.

I love the Bay Area. I was meant to live here. There are tons of farmer's markets, locally grown food is sold at grocery stores, and awesome musicians are everywhere all the time. Within the first week of school, I saw Terry Riley at the Berkeley Art Gallery. I sat within 30 feet of the man who wrote In C.

Because of everything that's happened, my blog has been neglected. That is going to change now.

Since moving here, I've found it easier to follow a primal lifestyle, mostly because I no longer live in the same house as my parents. Also, there seems to be more of an awareness of gluten-intolerance here than in Florida, so it's easier to order something at a restaurant without having to substitute a bunch of things just to make sure it's paleo.

In a nutshell, it's good to blogging again. Now, here's a new recipe.

Tuesday, May 31, 2011

Breakfast #1 - Liver, onions, eggs, brussel sprouts

Liver for breakfast you say? Well, why the heck not? Liver is amazingly nutritious, filling, and delicious when done correctly. In this recipe, I purchased a package of frozen calf livers. I repeat, CALF livers. While I have no qualms against beef livers, calf livers as much more tender and palatable for liver novices, or those with a bad experience of poorly cooked liver. I prepared this for my husband, who was forced to eat shoe leather-like liver as a child. After breakfast this morning, he was cured of his liver phobia. Also, I used frozen calf livers and frozen brussel sprouts, but fresh will work just as well in both cases. Fresh brussel sprouts will have to cook a little longer than frozen. If you're not a fan of steamed brussel sprouts, I implore you to try them sauteed, like I have in this recipe. The flavor is a completely different experience.

Ingredients:
Pack of frozen calf livers, sliced thin
Bag of frozen brussel sprouts
Eggs
Butter
Onions
Olive oil
Salt to taste.

First, melt two tablespoons of butter on medium heat. Cast iron works well for this recipe, but any skillet will do the trick. Saute desired amount of onion, approximately one small onion per two people, or more if you are just bonkers about onions. Saute onions until soft and lightly browned. While onions are hanging out in the pan, prepare a small saucepan (or small skillet) for the brussel sprouts. Add two tablespoons of olive oil, and heat the pan to medium-high heat. Cook brussel sprouts until hot and browned, with a slight crisp at the browned bits.

Go back to the skillet with the onions. Move onions to the side of the pan and add more butter if necessary. Add livers, add a little bit of salt to each side. Cook for 3-4 minutes on each side. While livers are cooking, work on your eggs. I prepared them over-easy so I could dip the liver in the egg yolk (so good). Prepare them however you'd like though.

AND IT'S DONE! DELICIOUS LIVER, EGG, BRUSSEL SPROUTY GOODNESS ENSUE!

Dinner #1 - Mahi with Sundried Tomatoes, Asparagus, and Pureed Cauliflower

My husband and I were in Homestead, FL this week, visiting family. We stayed at my mother-in-law's home and I made dinner. Dinner was inspired by the Mahi Wulfe entree at Carrabba's.

I baked the fish in the oven for about 25 minutes at 375 degrees (F) with butter, lemon, and salt. I just waited until it was flaky. On the stovetop, I combined sundried tomatoes (packed in oil), butter, lemon juice, garlic, and green onions, cooked at medium heat for about 20 minutes. I placed the mixture on the fish before serving. The fish was served alongside asparagus and pureed cauliflower.

And it was delicious.

Sunday, May 22, 2011

Eating in Oakland, CA


What better way to start off a primal eating blog than to show me eating NOT PRIMALLY?! Well, I think I did okay considering I was traveling and sort of on vacation. I definitely got some ideas that I want to take home with me.

Last week, my husband and I went to visit Oakland, CA. We looked for places to live and did a job interview. If we get the job, we get to move there the first week of July. If we don't, we'll move in August when we attend graduate school. Needless to say, it was hard to remain completely primal on this trip - we didn't have a fridge or microwave in our hotel, so we ate out every day for two meals, then dropped by Whole Foods for an evening snack. Our non-primal food consisted of cheese, potatoes, and the occasional 1/2 slice of wheat bread. All in all, we did okay - especially since we're new to primal eating.

The first is Lynn and Lu's Escapade Cafe on Grand Ave. While they have Asian dishes on the menu, we were there for breakfast, on more than one occasion.  We indulged ourselves on the potatoes, but avoided bread (to the best of our ability).


This is Eggs Escapade, which my husband ordered - a three egg scramble of tomatoes, green onions, avocado, and cheese. It came with grilled potatoes, topped with a dollop of sour cream. It came with wheat bread too, but we didn't eat it (I forgot to ask them to hold it - not used to asking that quite yet).


This is the tomato, mushroom, and brie omelette. 


We came back again another day, where I ordered the Eggs Escapade and my husband ordered an Italian sausage frittata.


We stopped in Chinatown one day, where we ate at the King of King restaurant. I got the Eggplant and Seafood plate - which was absolutely huge. This dish was terrific - bright purple Japanese eggplant and calamari in a spicy brown sauce. I could barely manage half the dish.


My favorite stop on this trip was Sura, a Korean restaurant on Telegraph Ave. in Temescal. This place was absolutely fantastic, and you definitely get your bang for your buck. Before our meal was served, the server brought out these mini-dishes. I have no idea what most of them were, but they were amazing.


This was easily one of the best dinners I've ever had - from Sura. It was a bolgot soup, with tender beef, cabbage, and an amazing broth. It came out at a rolling boil in a hot stone pot. Right before they brought it out, they cracked an egg in the soup, so it was cooking right in the pot. There were pieces of egg floating in the soup. I didn't realize that this dish came with cellophane noodles at the bottom, which I easily avoided. For a dish that was so simple, it was amazingly satisfying. I will come back just to eat this soup again.


Oakland is an amazing place for food! I can't wait to move there!

Thursday, May 19, 2011

The Frittata

Since I've been eating primally, I regularly only eat two meals a day. I'm rarely hungry around lunch time anymore, unless I've had a particularly hard morning workout. One reason is because my breakfast is incredibly satisfying. Also, it's always interesting.


Eggs are breakfast staple for me, and I frequently prepare eggs in a frittata format. The frittata is an open faced omelette, and can be prepared in a variety of ways. It's perfect it you're feeding a family of five, or just you and your significant other. It's also great if you're looking for a way to use last night's leftovers. Below is my preferred method for making frittatas.


For smaller frittatas (up to a dozen eggs, feeding four people), I prefer to do it in an 10"-11" skillet. If you're incorporating veggies or meat into your frittata, saute them first in about two tablespoons of oil or rendered fat. While your ingredients are sizzling, whip your desired amount of eggs with a whisk until lighter in color and foamy. Your forearm should get a little workout. Turn the pan down to low and add a little more oil if necessary. Wait momentarily for the pan to cool, then add eggs. Cover. Now be patient. If the pan is too hot, you risk overcooking the eggs at the bottom of the pan, and they'll be brown and rubbery. It's better to have a cooler pan and cook for longer. Six eggs will take about 10-12 minutes, nine will take from 13-17 minutes, and twelve will be upwards from 20 minutes. The frittata is ready when the top of it is firm, but slightly moist. You may choose to loosen the frittata with a spatula, place an upside down plate on the frittata, and turn the pan over. Keep in mind that this is difficult with "stickier" ingredients. So you can cut the frittata like a pie and serve it out of the pan (like the picture above).


For larger frittatas, (fifteen eggs or more, feeding five people or more), prepare the frittata in an overproof skillet. It's also perfectly acceptable to use a 9x13 baking pan and make the frittata like a casserole. Bake the frittata in the oven at 325 degrees (Fahrenheit) for at least 40 minutes, depending on your baking apparatus. I've heard of frittatas being cooked this way both covered and uncovered with a lid or foil. Personally, I prefer the softness of a covered frittata. Making a frittata without a lid will give you a firmer "top,"which would be great if your frittata involves cheese.


I usually only cook frittatas for myself and my husband, so I'll take a shower while the frittata is cooking.  While frittatas are slightly more time consuming than scrambled eggs or eggs over-easy, it's definitely convenient on a busy morning. Good luck with your frittata adventure! Anything is possible!


Picture above is from my own kitchen - a frittata with deli-style roast beef, onions, and Roma tomatoes. Served with half of a hass avocado and creamed kale.

Wednesday, May 18, 2011

The grand reveal of Primal Homeskillet!

Katie's Backstory


After many years of unsuccessful diets, unwittingly unhealthy eating habits, sugar crashes, complications from hypoglycemia, exercise misfortunes, and a general feeling of disappointment, I had finally found Mark Sisson's Primal Blueprint. I had been part of the high carb, low fat, chronic cardio craze that eventually resulted in weight gain, injury, and continual sickness.


In late April 2011, I discovered Primal Blueprint and the paleo lifestyle. Primal Blueprint completely challenged my previous notions of nutrition, particularly the importance of animal fat in the human diet. I was also blown away by how easily our dietary habits have been influenced by grain producers, Big Pharma, etc. After performing some of my own research, I delved into the primal philosophy with enthusiasm - no grain, no/limited dairy, no processed food, lots of fat, lots of veggies, lots of meat. I continue to lose weight and gain muscle at an outstanding pace. 


Why Primal Homeskillet?


I have fallen completely in love with primal food. In the words of a friend who also follows the paleo lifestyle,  "It's hard to call primal a diet when it's so delicious." I love to cook and consider myself very creative in developing primal meals for me and my husband. I wish to use this blog to update readers on my progress, but also to share ideas for making primal food a fun and interesting part of everyday life. I tend to adapt recipes from the Primal Blueprint Cookbook as well as tweak recipes from my childhood and elsewhere. I'll also post variations on a particular recipe to stimulate creativity in your own cooking. Primal living is an adventure, and I'm happy to partake.